Wednesday, April 29, 2009

Playing Your iTunes Radio

To tune in iTunes radio, perform the following steps:
  1. Open iTunes and select the Radio source by clicking it. The Content pane will contain the list of genres available to you. The column headings will be updated to be appropriate to the content. For example, you will see Stream, Bit Rate, and Comment.
  2. Click the expansion triangle for the genre in which you are interested (see Figure). iTunes will connect to the Internet to update the list of channels for the genre you selected, and the genre will expand. You will see the various channels it contains. Look at the stream name, bit rate, and comment for the channels to decide which you want to try. Usually, the comment will provide a description of the kind of music the stream contains.
  3. To play a channel, select it and click Play or double-click the stream you want to hear. The channel will begin to play (this will be instantaneous if you have a fast connection to the Net, or there will be a slight delay if you use a dial-up connection). Just like when you play a song on a CD, the speaker icon will appear next to the channel to which you are listening. Also just like when you listen to a CD, information about the channel will appear in the Information window. This includes the stream name, the song currently playing, and the Web site with which the channel is associated.
You can use the Volume slider to change the volume level and the Stop button to stop playback. The Rewind and Fast Forward buttons work a little differently than you might expect. Rather than moving you in the selected stream, they instead take you to the previous or next stream, which makes sense when you think about each stream as being like a track on a CD.

Monday, March 30, 2009

Listening to Internet Radio


iTunes supports Internet “radio” stations; you can choose one of the available stations and listen to its content similarly to how you listen to a radio station over the air. (The stations are actually Web sites that offer streaming MP3, but they are analogous to radio, so using that as a model is a good way to think about them.) iTunes offers a number of genres from which you can choose, such as Pop, Classic Rock, Jazz, and so on. Listening to one of these stations is much like listening to a CD (or any other source for that matter).

Controlling iTunes from the Mac’s Dock

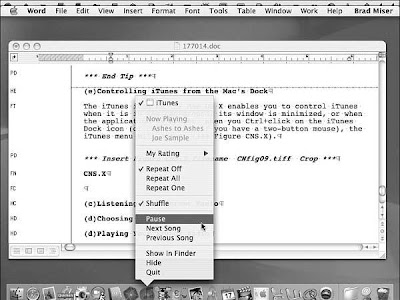
The iTunes icon on the Mac OS X enables you to control iTunes when it is in the background, when its window is minimized, or when the application is hidden. When you Ctrl-click the iTunes Dock icon (or right-click if you have a two-button mouse), the iTunes menu will appear (see Figure). At the top of this menu, you will see information about the song currently playing (the text is grayed out if iTunes is paused). You control iTunes by choosing a command on this menu. For example, you can pause the music by choosing Pause. After you choose a command, the menu will disappear, and you can get back to what you were doing.

Controlling iTunes from the Windows System Tray

When iTunes is running on a Windows machine, an iTunes icon is displayed in the System Tray. Right-click this icon and you will see an iTunes menu (see Figure). At the top of the menu, you will see information about the song that is playing (if iTunes is paused, this text will be grayed out). You can use the commands on this menu just as you can from within iTunes itself. For example, you can skip to the next song by choosing Next Song. After you choose a command, you can move off the menu and it will disappear. This is a handy way to control iTunes without having to make its window active or even show it.
If you don’t want the iTunes icon to appear in the System Tray for some reason, you can remove it. Open the iTunes Preferences dialog box (Ctrl+,), click the Advanced tab, uncheck the Show iTunes Icon in System Tray check box, and click OK. The icon will no longer appear in your System Tray.

Saturday, February 28, 2009

Repeating Tracks


Sometimes, you just can’t get enough. In that case, you can set iTunes to repeat an entire CD once or to repeat only a single song. To repeat your tunes, check out these pointers:
  • To have iTunes repeat an entire CD, choose Controls, Repeat All or click the Repeat button located at the bottom of the window (third one from the left). The Repeat button will become highlighted to show you that it is active, and the CD will repeat when you play it.
  • To repeat only the selected song, choose Controls, Repeat One or click the Repeat button a second time. A “1” will appear on the Repeat button to indicate that only the current song will be repeated.
  • To turn off the repeat function, choose Controls, Repeat Off or click the Repeat button until it is no longer highlighted in blue.

Getting Random


For a little variety, you can have iTunes play songs in a random order. This feature is called Shuffle. To use this feature, click the Shuffle button located at the bottom of the window (second one from the left) or choose Controls, Shuffle. The songs will be reordered in the Content pane and will play in the order in which they are listed (hopefully in a random fashion). The Shuffle button will be highlighted to indicate that it is active.
To return the CD to its natural order, click the Shuffle button again or choose Controls, Shuffle.

Wednesday, January 14, 2009

Choosing the Order in Which Songs Play

iTunes determines the order in which songs play by the order in which they are shown in the Content pane, starting from the top of the pane and moving to the bottom. By default, songs are listed and therefore play in the order they appear on the CD, from track 1 to the last track on the disc. However, you can make songs on a CD play in any order you choose. You have a couple ways to do this. You can change the order in which songs are listed in the Content pane (and thus the order in which they play) by dragging the songs up or down in the pane (see Figure A). When you change the order of the songs in the pane, you change the order in which they will play.
You can also change the order of tracks by sorting the Content pane by the various attributes shown, such as Song Name, Time, Artist, and so on. You can do this by clicking the column heading of the attribute by which you want to sort the list. When you do so, the tracks will be sorted by that column (see Figure B). To change the direction of the sort (from ascending to descending or from descending to ascending), click the Sort Order triangle; the sort direction will be reversed, and the songs will be reordered accordingly. Just like when you manually move songs around, they will play in the order in which they are listed in the pane.

The column by which the pane is sorted is indicated by the column heading being highlighted in blue—this defaults to the first column, which is the track number. (When a CD is the source, the Track Number column is always the first or leftmost column in the Content pane, and it’s unlabeled.) When you select a different column, its heading becomes blue to show that it is the current sort column.
You can also tell which column is the sort column as well as the direction of the sort by the Sort Order triangle. It only appears in the sort column. When the triangle is pointing down, the sort is descending. When the triangle is pointing up, the sort is ascending.