Monday, August 31, 2009

Configuring the Location of the Music Folder


In most cases, the default location of your iTunes Music folder will be fine, and you don’t have to do anything about it. However, there are some cases in which you will want to change the location of this folder. For example, suppose you have several hard drives in your computer and the one on which the folder is currently stored doesn’t have a lot of room. Even though individual song files are relatively small, you are likely to end up with thousands or tens of thousands of them in your Library.
That can add up to a lot of disk space. You might want to change the location of your iTunes Music folder so that it is on a drive with more room.
To change the location of this folder, do the following:
  1. Open the Advanced pane of the iTunes Preferences dialog box.
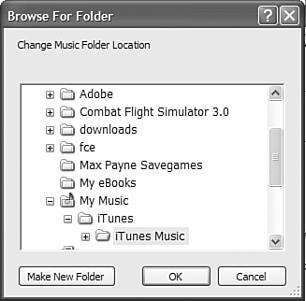
  2. Click the Change button. On a Windows PC, you will see the Browse For Folder dialog box (see Figure). On a Mac, you will see the Change Music Folder Location dialog box
  3. Use the dialog box to move to and select the folder in which you want your iTunes Music folder to be located.
  4. Click OK (Windows) or Open (Mac). You’ll return to the Advanced pane, and the folder you selected will be shown in the iTunes Music Folder Location area.
  5. Click OK to close the iTunes Preferences dialog box.

Working with the iTunes Music Folder


As you import music into the Library, files are created for each song you add (whether it’s from a CD, downloaded from the iTunes Music Store, or imported from an existing file). When you first started the application, iTunes created a folder in which it stores all the music it manages for you.
The default location of this folder depends on the kind of computer you are using. On
Windows computers, the folder will be stored in a folder called iTunes Music, located within your My Music folder. On Macs, this folder is also called iTunes Music, but it is located in the Music folder within your Home folder.
To see the current location of the iTunes folder on your computer, open the iTunes Preferences dialog box and then open the Advanced pane (see Figure). At the top of this dialog box, you will see the iTunes Music Folder Location box. Within this box, you will see the path to your iTunes Music folder.
Just for fun, go ahead and open your iTunes Music folder so you can see it for yourself. Use the path you see on the Advanced pane to find it. If you haven’t added any music to your Library yet, it might be pretty dull. To see what a full folder looks like, check out Figure.
As you can see, within the iTunes Music folder is a folder for each artist. Within the artists’ folders, each album from which you have added music is shown. Within each of those folders, the tracks you have added are individual files.

Gathering Your Music from All the Right Places


If you are going to add music to your Library, you have to get it from somewhere, right? The following are the three main sources of tunes for your Library:
  • Audio CDs—Who wants to bother with audio CDs? Wouldn’t it be nice if you could store all of the content of your CD collection in one place so you can listen to any music you want to at any time just by browsing or doing a quick search? Obviously, that is a loaded question because you already know you can use iTunes to do just that. In this chapter, you’ll learn how to copy the music from audio CDs into your Library so that you never have to use the original CDs again.
  • MP3 and other audio files—You can add audio files in just about any format to your Library. For example, there are lots of free and legal MP3 files on the Web that you can add to your own Library. In this chapter, you will learn how to add music to your Library in this way too.
  • iTunes Music Store—With the iTunes Music Store, you can browse and search among hundreds of thousands of songs.
When you find music you like, you can purchase an entire CD’s worth of songs or you can buy individual songs (can you say one-hit wonders!). When you buy a song, it is downloaded and added to your iTunes Library. Instead of ordering a CD or, even worse, buying one in a real store, your music is available to you instantly, and you don’t even have to import it. Because the iTunes Music Store is so cool,

Friday, July 31, 2009

Building, Browsing, Searching, and Playing Your iTunes Music Library

Are you ready for some real iTunes? Here is where we start taking your iTunes game to the next level, hitting some home runs, scoring touchdowns, and some other sports clichés that all good books use. It’s time to start working with that mysterious Library I have mentioned a number of times but into which you have only had glimpses.
The iTunes Library is where you can store all your music, such as that from your audio CDs and the Internet, and where any music you purchase from the iTunes Music Store is stored. After you have added music to your Library, you never have to bother with individual CDs again because you can access all your music from the Library. And, you can use the music in your Library in many ways, such as to create playlists, burn CDs, and so on.
Right now, your iTunes Library is probably sort of sad. Like a book library with no books in it, your iTunes Library is just sitting there gathering dust on its digital shelves. You will change that shortly. The first step is to add music to the Library. Then, you’ll learn how to browse, search, and listen to the tunes you have added there.

Tips on Using iTunes

By learning how to use iTunes to play audio CDs and Internet radio, you’ve picked up a lot more knowledge than you might realize. That’s because you use the same steps and controls to listen to other music sources, such as your Library, playlists, and so on.
  • Many of the controls in the iTunes window work just like similar controls on a CD player.
  • The iTunes Information window doesn’t look like a lot, but you’ll learn to really love it when you are building your Library.
  • If a song’s Selected check box is checked, it will play. If it’s not checked, the song won’t play.
  • You determine the songs you want to hear and the order in which you want to hear them for all your sources by the order in which they appear in the Content pane (except for the Radio source, which you have to take as it comes). Each time you insert a CD, iTunes remembers the settings you used last time and uses those settings again. Just wait until you get to playlists—you can take this concept to the extreme!
  • You can repeat or randomize the music in any source, such as a CD or playlist.
  • Don’t forget about the iTunes System Tray (Windows) or Dock (Mac) menu. This is a great way to keep iTunes music going while not consuming any of your valuable desktop real estate.
  • You can change the width of columns within the iTunes window, and you can also resize the iTunes window to make it the size you want. As you work through later, you’ll also learn how to customize the information you see inside the window as well.
  • Listening to the Radio source provides access to lots of music available on the Internet.
  • You can use iTunes Effects to control the gap between songs, to equalize the relative volume of songs, and to enhance the sound you hear.

Setting iTunes Effects Preferences


You can use iTunes Effects to control how your music plays. For example, you can get rid of the gap of silence between songs or make songs play back at a consistent volume level. You can take advantage of these features by using the Effects pane of the iTunes Preferences dialog box. On this pane, you can configure the following effects for your music (see Figure):
  • Crossfade playback—This effect causes one song to fade out and the next one to fade in smoothly, eliminating the gaps of silence between songs. To activate it, check the Crossfade Playback check box and use the slider to see the amount of fade time. If you move the slider to the left, songs will fade out more quickly. If you set it to 0, there is no fading, and as soon as one song ends, the next one starts. If you move the slider to the right, the fades will last longer. Click OK and the effect will take effect.
  • Sound Enhancer—This effect is iTunes’ attempt to “add depth and enliven” the quality of your music. The actual result of this effect is a bit difficult to describe, so the best thing to do is try it for yourself. Check the Sound Enhance check box and use the slider to set the relative amount of enhancement. Click OK and then listen to some music. It if sounds better to you, increase the amount of the effect. If not, decrease it or turn it off.
  • Sound Check—This effect sets the relative volume level of all songs the same. It is useful if you have changed the relative volume level of songs (perhaps you cranked up your favorite classical tunes) and want to have all your music play at the same volume level. To implement this effect, check its check box and click OK.

Tuesday, June 30, 2009

Changing the Size of the iTunes Window on a Mac

When you use iTunes on a Mac, you can change the window’s size in the following ways:
■ You can hide the application. Press „+H to hide the application. Its window will be hidden from the desktop. You can control iTunes by using its Dock menu. Click the iTunes Dock icon to show the window again.
■ You can toggle the size of the window. If you click the Toggle Size button (the green “light”) on the window’s title bar, the iTunes window will collapse so that only the playback controls and the Information window are shown. Click the button again to open the window to its full size.
■ You can change the size of the window. In either the full or collapsed state, you can change the size of the window by dragging its resize handle located in the bottom-right corner of the window.