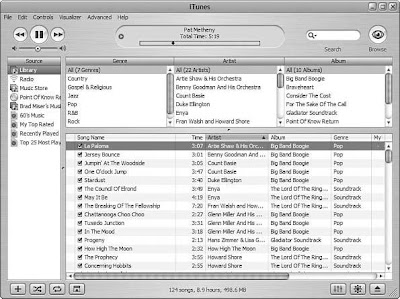
When you view the Browser, you see the genre, artist, and album tags associated with the songs you are browsing
Wednesday, March 31, 2010
Viewing Tags in the Browser
When you view the Browser, you see the genre, artist, and album tags associated with the songs you are browsing
Understanding Song Tags and Knowing Why You Should Care About Them
You saw how you can browse your iTunes music collected by genre, artist, and album. This makes finding music fast and easy, even if you have thousands of songs in your Library. This functionality is enabled because each song in your Library has information—also called tags—that categorizes and identifies those songs for you. Genre, artist, and album are just three of the possible tags for each song in iTunes. There are many more items of information that iTunes manages.
These types of data fall into two groups: data that iTunes assigns for you and that you can’t change, and data that you or iTunes assigns and that you can change.
Data that iTunes assigns and that you can view but can’t change include the following:
■ Kind—The type of file the song is, such as AAC, MP3, and so on.
■ Size—The amount of disk space required to store the song.
■ Bit Rate—The quality level at which the song was encoded. Larger numbers, such as 128Kbps, are better.
■ Sample Rate—The rate at which the music was sampled when it was captured.
■ Date Modified—The date on which the song file was last changed.
■ Play Count—The number of times the song has been played.
■ Last Played—The last time the song was played.
■ Profile—A categorization of the song’s complexity.
■ Format—The format in which the song was encoded, such as MPEG-1, Layer 3, and so on.
■ Channels—Whether the track is stereo or mono.
■ Encoded With—The tools used to encode the song, such as iTunes, QuickTime, and so on.
■ ID3 Tag—Data formatted according to a set of specifications. If a song’s data has been formatted with this specification, the ID3 version number will be shown
■ Purchase By and Account Name—Information that identifies who purchased the music from the iTunes Music Store and what account was used.
■ Where—A path to the song’s file on your computer along with the file’s name.
Data collected for songs that you can change includes the following:
■ Name—The name of the song.
■ Artist—The person who performs the song.
■ Album—The name of the album from which the song comes.
■ Grouping—A label you can assign to group songs together in some fashion.
■ Composer—The person who is credited with writing the song.
■ Comments—A free-form text field in which you can make comments about a song.
■ Genre—A song’s musical genre, such as jazz or classical.
■ Year—The year the song was created.
■ Track Number—The song’s position on the CD from which it came, such as “2 of 12.”
■ Disc number—The number of the CD. This is meaningful only for multiple CD sets.
■ BPM—The song’s beats per minute.
■ Compilation—An indicator of whether the song is part of a compilation in the Library, such as coming from a CD that is stored in the Library.
When you add a song to your Library, iTunes will add as much of this data as it can find for each song. However, you can add or change the data in the previous list.
So, why should you care about all this data? There are a couple of reasons.
The first is that, if you already know how to browse and search your Library, this data can be used to find music in which you are interested. That reason alone should be enough to convince you that these types of data are important to you.
The second reason is, when it comes time to create playlists, you can use song tags to determine which songs are included in your playlists. For example, you can configure a playlist to include the last 25 songs you have played from the Jazz genre. This is just a basic example—you can get much more sophisticated than that. In fact, you can include lots of different combinations of these types of data as criteria in playlists to create very interesting sets of music to listen to.
Sunday, February 28, 2010
Removing Tunes from the Music Library
To remove songs from your Library, ditch them with the following steps:
- Find the songs you want to delete by browsing or searching.
- Select the songs you want to trash. They will become highlighted to show you they are selected
- Press the Delete key. You will be prompted to confirm that you really want to delete the song you have selected.
- Click Yes to confirm the deletion. You will see another prompt asking if you want the selected files to be moved to your Recycle Bin (Windows) or Trash (Mac).
- Click Yes. The selected songs will be deleted from your Library, and their song files will be moved to the appropriate trash receptacle on your computer. The next time you empty that receptacle, they will be gone forever.
such as on a CD or stored in some other location. If you imported the music from your hard disk and had iTunes move the songs files to your iTunes Music folder, your only copy will reside in your iTunes Library, so make sure you have such music backed up before you delete it if you might ever want it again.
Playing Music in Your Music Library
Remember earlier when I said that you use the same listening techniques to listen to music in your Library as you do when listening to a CD? Now it’s time to prove my words.
When you listen to music in your Library, you start by choosing the scope of the music you want to hear. You do this by browsing or searching for music (if you don’t know how to do this, here’s a hint: Read the previous two sections).
After you have the group of songs to which you want to listen showing in the Content pane, use the listening tools you learned about in the previous chapter to listen to your music. For example, you can click Play to play the songs, use the Repeat button to repeat them, sort the Content pane by one of the column headings to change the order in which the songs play, and so on.
Sunday, January 31, 2010
by any of the following criteria:
■ All (searches all possible data)
■ Artists
■ Albums
■ Composers
■ Songs
To search for music in your Library, perform the following steps:
1. Select the source you want to search (in this case, click the Library source). As you might surmise, you can search any source in the Source List, such as a CD, playlist, and so on, by selecting it and then performing a search.
2. Click the magnifying glass icon in the Search tool. You will see a menu containing the list of data by which you can search.
3. Select the data for which you want to search in the menu. When you release the mouse button, the data you selected will appear in gray inside the search box and in regular text underneath it so you can see which data you are searching for. For example, choose Artists to search by the Artist field.
4. Type the data for which you want to search in the field. As you type, iTunes searches the selected source and presents the songs that meet your criterion in the Content pane. It does this on the fly so that the search narrows with each keystroke. As you type more text or numbers, the search becomes more specific.
5. Keep typing until the search becomes as narrow as you need it to be to find the songs in which you are interested.
After you have found songs, you can play them, use them in playlists, and so on. To clear your search, click the Clear Search button that appears in the Search tool after you have typed in it. The songs shown in the Content pane will again be determined by your selections in the Browser.
Browsing in the iPod Library
1. Select the Library on the Source List.
2. If the Browser isn’t showing, click the Action button, which is now labeled Browse (it looks like an eye). The Browser will appear. The Browser has three columns: Genre, Artist, and Album. The columns start on the left with the most general category, Genre, and end on the right with the most specific category, which is Album. If you don’t see the Genre column in the Browser, open the General pane of the iTunes Preferences dialog box and check the Show Genre when Browsing check box.
The contents of the “path” selected in the Browser are shown in the Content pane that now occupies the bottom part of the right side of the window. At the top of each column is the All option, which shows all the contents of that category.
For example, when All is selected in the Genre column, you will see the contents of all the genres for which you have music in the Library. At the bottom of the screen, you will see Source Information for the selected source.
3. To start browsing your Library, select the genre in which you are interested by clicking it. When you do so, the categories in the other two columns are scoped down to include only the artists and albums that are part of that genreSimilarly, the Content pane now includes only jazz music.
4. To further limit the browse, click an artist in which you are interested in the Artist column. The Album column will be scoped down to show only those albums for the artist selected in the Artist column. Also, the Content pane will show the songs on the albums listed in the Album column.
5. To get down to the most narrow browse possible, select the album in which you
are interested in the Album column. The Content pane will now show the songs on the selected album.
6. When you have selected the genre, artist, and album categories in which you are
interested, you can scroll in the Content pane to see all the songs included in the group of songs you are browsing.
To make the browse results less narrow again, choose All in one of the Browser’s columns. For example, to browse all your music again, click All in the Genre column.
Hopefully, you can see that you can use the
Browser to quickly scan your Library to locate music that you want to hear or work with. As you use the Browser more, you will come to rely on it to get you to a group of songs quickly and easily.
Importing Audio Files into Your Library
Another potential source of music for your Library is the Internet. There are millions of audio files there, and you can download these files and add them to your Library.
Or, you might have lots of MP3 files on your omputer already. You can add all these to your Tunes Library so that you can use that music rom within iTunes as well.
You can add music that is stored on your hard drive to your iTunes Library by following these steps:
- Locate the files you want to add to your ibrary. For example, find the MP3 files n your hard drive or go to a Web site hat has audio files, such as MP3 files, and download them to your computer.
- In iTunes on a Windows computer, choose File, Add File to Library to ad ndividual music files or File, Add older to Library to add a folder full of usic files. On a Mac, choose File, Add o Library. If you used the Add Folder to ibrary command, you’ll see the Browse or Folder dialog box. If you used the Add ile to Library command, you’ll see the dd to Library dialog box.
- Use the dialog box to move to and select he folder containing the files you want to add or to select the files you want to add to the Library.
- Click Open, OK or Choose (the name of the button you see depends on the command you use). The files you selected will be imported into your Library. If you selected a folder, all the songs it contains will be added to your Library. You can also add song files to your iTunes Library by dragging them from the desktop onto the Content pane. This does the same thing as using one of the Add to Library commands.
Subscribe to:
Posts (Atom)