Thursday, December 31, 2009

Building Your iTunes Music Library in a Hurry

The import process moves along pretty quickly, but you can make it even faster by following these steps:
  1. Gather a pile of your CDs in a location close to your computer.
  2. Set the import preferences (encoder and quality) for the import session.
  3. Open the General pane of the iTunes Preferences dialog box.
  4. Choose Import Songs and Eject on the On CD Insert menu. This causes iTunes to immediately begin the import process when you insert a CD. When the import process is complete, the CD will be ejected automatically.
  5. Click OK to close the dialog box.
  6. Insert the first CD you want to import. iTunes will start importing it automatically.When the process is complete, the CD will be ejected automatically.
  7. Insert the next CD you want to import. Again, iTunes will import the music and eject the disc when it is done.
  8. Repeat step 7 until all the CDs have been imported. You’ll be amazed at how quickly you can build a Library, even if you have a large number of CDs. When you are done batch importing your CDs, you might want to reset the On CD insert menu to Show Songs to prevent unintentionally importing a CD.

Adding Audio CDs to Your Library


Use these steps to add a CD to your Library:
  1. Configure the encoder you want to use for the import session.
  2. Insert the CD you want to add to your Library. iTunes will attempt to identify it. When it does, the CD will appear in the Source List and will be selected. Notice that the Action button in the upper-right corner of the screen is now the Import button.
  3. If there are songs that you don’t want to add to the Library, uncheck their Selected check box. Only songs with their check boxes checked will be imported. Unless you really hate a song or disk space is at a premium for you, it is generally better to import all the songs. You can use the Selected check box in another source, such as in your Library, to cause those songs to be skipped when you play that source.
  4. Click the Import button. It will become highlighted, and the import process will start . If you left the Play songs while importing preference active, the music will begin to play as it is imported.
The Information window will show information related to the import process, such as the name of the song currently being imported and the rate at which the import process is happening. The rate of the import process depends on the hardware you are using and the import settings. In most cases, the import process will occur at a much greater rate than the playing process. For example, with moderate hardware, you can usually achieve import rates of 10, meaning 10 minutes of music will be imported in 1 minute of time. An orange circle with a “squiggly” line inside it marks the song currently being imported. When a song has been imported, it is marked with a green circle containing a check mark.
5. Eject the CD.

Configuring iTunes to Import Music

When you add music to your Library, you start by choosing the import options (mainly format and quality levels) that you want to use. Here are the steps to follow:
  1. Open the Importing pane of the iTunes Preferences dialog box
  2. Select the format in which you want to add music to your Library on the Import Using menu. For example, to use the AAC format, choose AAC Encoder. To use the MP3 format, choose MP3 Encoder. The other encoder options are WAV and AIFF. For music, you should use AAC or MP3.
  3. Choose the quality level of the encoder you want to use on the Setting menu. The options you see in this list depend on the format you selected in step 1. If you chose AAC Encoder, you have two quality options: High Quality and Custom. If you chose MP3 Encoder, you have four options: Good Quality, High Quality, Higher Quality, and Custom. The Custom option enables you to configure specific settings that the encoder will use. Because you don’t typically need to do this, we won’t explore doing so in this chapter. If you want to check it out, choose Custom on the Setting menu and explore the options you see. In the Details box, you will see a summary of the settings you have selected. For example, you will see the data rate of the encoder, such as 128Kbps, and the processor for which the encoder has been optimized. (Do you need to worry about these details? Not really.) If you use the AAC encoder, the High Quality setting will likely be all you ever need. If you use the MP3 encoder, try the High Quality setting. If music at this quality sounds good to you, try the Good Quality setting to see whether you can detect any difference. If not, use that setting. If the High Quality setting doesn’t sound good enough, increase the quality to the Higher Quality setting.
  4. If you want music you add to your Library to play while it is being added, check the Play songs while importing check box. This is a personal preference, and it doesn’t impact the encoding process significantly.
  5. If you want the files that iTunes creates when you import music to include the track number in their filenames, check the Create filenames with track number check box. Because this helps you more easily find files for specific songs, I recommend that you keep this preference active.
  6. The Use error correction when reading Audio CDs check box causes iTunes to more closely control the encoding process. You should use this option only if you notice problems with the music you add to your Library, such as cracking or popping sounds. If that happens, check this check box and try the import process again.
  7. Click OK to close the dialog box.

Saturday, October 31, 2009

Picking Song Quality Levels


After you select a format, you decide the quality with which the music will be encoded. Higher quality levels mean better-sounding music, but larger file sizes. If file size is not a problem, then choosing a higher quality setting is the way to go. If you have relatively little disk space, you might want to experiment to see which is the lowest quality setting you can choose that results in music that still sounds good to you.
Note that when it comes to music, quality is in the ear of the beholder. Also, it heavily depends on the type of music you listen to as well as how you listen to it. For example, if you listen to heavy metal rock using a low-quality pair of speakers (in other words, cheap speakers), quality will be less of an issue for you because you likely won’t hear any difference anyway. However, if you listen to classical music on high-quality speakers, the differences in quality levels will likely be more noticeable.
The trade-off for quality is always file size. The higher the quality setting you choose, the larger the resulting files will be. If you don’t have disk space limitations and have a discriminating ear, you might want to stick with the highest possible quality setting. If disk space is at a premium for you, then consider using a lower quality setting if you can’t detect the difference or if that difference doesn’t bother you.

Choosing a Format Option


Although I am sure that going into the specifications for each kind of format would make for fascinating reading, there isn’t really any need to get into that detail. Frankly, the benefit of using an application such as iTunes is that it manages all this complexity for you so that you don’t have to be concerned with it. If you are like me, you just want to work with the music, not diddle around with complicated settings.
Generally, when you add music to your Library, you should use either the AAC or MP3 format. Because the AAC format is better (with better meaning that it provides higher quality music in smaller file sizes), it is usually the best choice.

Setting Other Organization Preferences


The location of the folder in which your music will be stored is likely the most important part of the organization preferences. However, you’ll need to understand a couple more preferences.
These are also located on the Advanced pane of the iTunes Preferences dialog box:
  • Keep iTunes Music Folder Organized—This preference causes iTunes to organize your music as described earlier—that is, by artist, album, and song. Because this is a logical way to organize your music files, I recommend that you leave this option active by making sure this check box is checked.
  • Copy Files to iTunes Music Folder when Adding to Library—This preference causes iTunes to make a copy of audio files that already exist on your computer (such as MP3 files you have downloaded from the Internet), and it places those copies in your iTunes Music folder, just like files you create by importing them from a CD.
If this preference is inactive, iTunes uses a pointer to song files you are adding instead of making a copy of the files; it doesn’t actually place the files in your iTunes Music folder. I recommend that you make this preference active by checking its check box. This way, all your music files will be in the same place, no matter where they came from originally. If you don’t have iTunes make copies when you add songs to your Library and then you delete or move the song files you added, iTunes will lose track of the song and you will experience the “missing song file” problem.

Monday, August 31, 2009

Configuring the Location of the Music Folder


In most cases, the default location of your iTunes Music folder will be fine, and you don’t have to do anything about it. However, there are some cases in which you will want to change the location of this folder. For example, suppose you have several hard drives in your computer and the one on which the folder is currently stored doesn’t have a lot of room. Even though individual song files are relatively small, you are likely to end up with thousands or tens of thousands of them in your Library.
That can add up to a lot of disk space. You might want to change the location of your iTunes Music folder so that it is on a drive with more room.
To change the location of this folder, do the following:
  1. Open the Advanced pane of the iTunes Preferences dialog box.
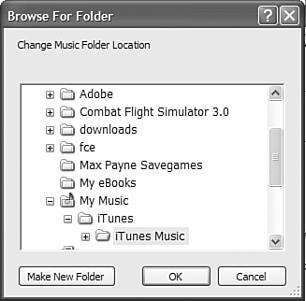
  2. Click the Change button. On a Windows PC, you will see the Browse For Folder dialog box (see Figure). On a Mac, you will see the Change Music Folder Location dialog box
  3. Use the dialog box to move to and select the folder in which you want your iTunes Music folder to be located.
  4. Click OK (Windows) or Open (Mac). You’ll return to the Advanced pane, and the folder you selected will be shown in the iTunes Music Folder Location area.
  5. Click OK to close the iTunes Preferences dialog box.

Working with the iTunes Music Folder


As you import music into the Library, files are created for each song you add (whether it’s from a CD, downloaded from the iTunes Music Store, or imported from an existing file). When you first started the application, iTunes created a folder in which it stores all the music it manages for you.
The default location of this folder depends on the kind of computer you are using. On
Windows computers, the folder will be stored in a folder called iTunes Music, located within your My Music folder. On Macs, this folder is also called iTunes Music, but it is located in the Music folder within your Home folder.
To see the current location of the iTunes folder on your computer, open the iTunes Preferences dialog box and then open the Advanced pane (see Figure). At the top of this dialog box, you will see the iTunes Music Folder Location box. Within this box, you will see the path to your iTunes Music folder.
Just for fun, go ahead and open your iTunes Music folder so you can see it for yourself. Use the path you see on the Advanced pane to find it. If you haven’t added any music to your Library yet, it might be pretty dull. To see what a full folder looks like, check out Figure.
As you can see, within the iTunes Music folder is a folder for each artist. Within the artists’ folders, each album from which you have added music is shown. Within each of those folders, the tracks you have added are individual files.

Gathering Your Music from All the Right Places


If you are going to add music to your Library, you have to get it from somewhere, right? The following are the three main sources of tunes for your Library:
  • Audio CDs—Who wants to bother with audio CDs? Wouldn’t it be nice if you could store all of the content of your CD collection in one place so you can listen to any music you want to at any time just by browsing or doing a quick search? Obviously, that is a loaded question because you already know you can use iTunes to do just that. In this chapter, you’ll learn how to copy the music from audio CDs into your Library so that you never have to use the original CDs again.
  • MP3 and other audio files—You can add audio files in just about any format to your Library. For example, there are lots of free and legal MP3 files on the Web that you can add to your own Library. In this chapter, you will learn how to add music to your Library in this way too.
  • iTunes Music Store—With the iTunes Music Store, you can browse and search among hundreds of thousands of songs.
When you find music you like, you can purchase an entire CD’s worth of songs or you can buy individual songs (can you say one-hit wonders!). When you buy a song, it is downloaded and added to your iTunes Library. Instead of ordering a CD or, even worse, buying one in a real store, your music is available to you instantly, and you don’t even have to import it. Because the iTunes Music Store is so cool,

Friday, July 31, 2009

Building, Browsing, Searching, and Playing Your iTunes Music Library

Are you ready for some real iTunes? Here is where we start taking your iTunes game to the next level, hitting some home runs, scoring touchdowns, and some other sports clichés that all good books use. It’s time to start working with that mysterious Library I have mentioned a number of times but into which you have only had glimpses.
The iTunes Library is where you can store all your music, such as that from your audio CDs and the Internet, and where any music you purchase from the iTunes Music Store is stored. After you have added music to your Library, you never have to bother with individual CDs again because you can access all your music from the Library. And, you can use the music in your Library in many ways, such as to create playlists, burn CDs, and so on.
Right now, your iTunes Library is probably sort of sad. Like a book library with no books in it, your iTunes Library is just sitting there gathering dust on its digital shelves. You will change that shortly. The first step is to add music to the Library. Then, you’ll learn how to browse, search, and listen to the tunes you have added there.

Tips on Using iTunes

By learning how to use iTunes to play audio CDs and Internet radio, you’ve picked up a lot more knowledge than you might realize. That’s because you use the same steps and controls to listen to other music sources, such as your Library, playlists, and so on.
  • Many of the controls in the iTunes window work just like similar controls on a CD player.
  • The iTunes Information window doesn’t look like a lot, but you’ll learn to really love it when you are building your Library.
  • If a song’s Selected check box is checked, it will play. If it’s not checked, the song won’t play.
  • You determine the songs you want to hear and the order in which you want to hear them for all your sources by the order in which they appear in the Content pane (except for the Radio source, which you have to take as it comes). Each time you insert a CD, iTunes remembers the settings you used last time and uses those settings again. Just wait until you get to playlists—you can take this concept to the extreme!
  • You can repeat or randomize the music in any source, such as a CD or playlist.
  • Don’t forget about the iTunes System Tray (Windows) or Dock (Mac) menu. This is a great way to keep iTunes music going while not consuming any of your valuable desktop real estate.
  • You can change the width of columns within the iTunes window, and you can also resize the iTunes window to make it the size you want. As you work through later, you’ll also learn how to customize the information you see inside the window as well.
  • Listening to the Radio source provides access to lots of music available on the Internet.
  • You can use iTunes Effects to control the gap between songs, to equalize the relative volume of songs, and to enhance the sound you hear.

Setting iTunes Effects Preferences


You can use iTunes Effects to control how your music plays. For example, you can get rid of the gap of silence between songs or make songs play back at a consistent volume level. You can take advantage of these features by using the Effects pane of the iTunes Preferences dialog box. On this pane, you can configure the following effects for your music (see Figure):
  • Crossfade playback—This effect causes one song to fade out and the next one to fade in smoothly, eliminating the gaps of silence between songs. To activate it, check the Crossfade Playback check box and use the slider to see the amount of fade time. If you move the slider to the left, songs will fade out more quickly. If you set it to 0, there is no fading, and as soon as one song ends, the next one starts. If you move the slider to the right, the fades will last longer. Click OK and the effect will take effect.
  • Sound Enhancer—This effect is iTunes’ attempt to “add depth and enliven” the quality of your music. The actual result of this effect is a bit difficult to describe, so the best thing to do is try it for yourself. Check the Sound Enhance check box and use the slider to set the relative amount of enhancement. Click OK and then listen to some music. It if sounds better to you, increase the amount of the effect. If not, decrease it or turn it off.
  • Sound Check—This effect sets the relative volume level of all songs the same. It is useful if you have changed the relative volume level of songs (perhaps you cranked up your favorite classical tunes) and want to have all your music play at the same volume level. To implement this effect, check its check box and click OK.

Tuesday, June 30, 2009

Changing the Size of the iTunes Window on a Mac

When you use iTunes on a Mac, you can change the window’s size in the following ways:
■ You can hide the application. Press „+H to hide the application. Its window will be hidden from the desktop. You can control iTunes by using its Dock menu. Click the iTunes Dock icon to show the window again.
■ You can toggle the size of the window. If you click the Toggle Size button (the green “light”) on the window’s title bar, the iTunes window will collapse so that only the playback controls and the Information window are shown. Click the button again to open the window to its full size.
■ You can change the size of the window. In either the full or collapsed state, you can change the size of the window by dragging its resize handle located in the bottom-right corner of the window.

Sunday, May 31, 2009

Changing the Size of the iTunes Window on a Windows PC

As you use iTunes, keep in the mind the following tips for keeping the window out of your way:
  • You can minimize/maximize the window. Use the standard Minimize and Maximize controls in the iTunes window to hide it or make it full-screen size.
  • You can make the window smaller. If the iTunes window is in the resize mode (click the Maximize button so the window’s size is maximized, then click it again), you can drag its resize handle to make the window smaller until it reaches the smallest possible size (see Figure). Then, you can slide the window out of the way.

Setting General iTunes Preferences

On the General pane of the Preferences dialog box are several settings you might want to use:
  • Source Text—Use this drop-down list to change the size of the font of the sources shown in the Source List. The options are Small (default) and Large.
  • Song Text—This setting changes the size of the text used in the Content pane. Again, your options are Small and Large.
  • Show Genre When Browsing—Earlier, you learned about the Browser. This check box controls whether the Genre column appears in the Browser (the check box is checked) or not (the check box is not checked). I like the Genre column, so I leave this checked, but if you don’t, you can uncheck the check box.
  • Connect to Internet When Needed—If you don’t want iTunes to try to connect to the Internet automatically, such as when you are using it on a laptop, uncheck this check box. Because iTunes uses the Internet to get CD information, provide Internet radio, and access the iTunes Music Store, you should leave this check box checked whenever you are using iTunes on a computer that can connect to the Internet.

Playing Around with Internet Audio

You can do a couple other things with Internet audio using iTunes. If you want iTunes to be used to play Internet audio by default, open the Preferences dialog box (Ctrl+, on Windows computers or „+, on Macs). Open the General pane. Then check the Use iTunes as the Default Player for Audio Files check box (Windows) or click the Set button (Mac). When your browser hits an audio file that iTunes supports, iTunes should play it.
You can also play audio streams for which you have a URL within iTunes. To do this, use the following steps:
  1. Find the URL pointing to the stream to which you want to listen. Hopefully, you can copy the URL from the Address bar of the Web browser because that is a lot easier than trying to remember the URL or writing it down and then typing it in.
  2. Choose Advanced, Open Stream. The Open Stream dialog box will appear.
  3. Paste in or type the URL in the URL field.
  4. Click OK. The stream will play.

Wednesday, April 29, 2009

Configuring iTunes for a Slow Internet Connection


If you use a slow Internet connection, such as a dial-up account, traffic on the Internet can cause the stream of music to slow or even stop, resulting in pauses in the music, even if you choose a lower bit-rate channel, such as 32Kbps. If this is a problem for you, perform the following steps:
  1. Choose Edit, Preferences (Windows) or iTunes, Preferences (Mac). The Preferences dialog box will appear.
  2. Click the Advanced tab (Windows) or the Advanced icon (Mac). The Advanced pane will appear (see Figure).
  3. On the Streaming Buffer Size dropdown list, choose Large. This increases the amount of buffer space used to store a stream before it actually starts to play.
  4. Click OK. The dialog box will close.
Hopefully, this will eliminate any pauses in the streams to which you like to listen. If not, choose a different stream or one with a lower bit rate.

Refreshing Your Radio

When you choose the Radio source, the Action button becomes the Refresh button. When you click this, all the genres are refreshed with the latest content. If you leave the Radio source selected for a long time, you might want to click the Refresh button once in a while to see if new channels become available. (Each time you select the Radio source, it is refreshed, so you don’t need to click the Refresh button if you have recently selected the Radio source.)

Playing Your iTunes Radio

To tune in iTunes radio, perform the following steps:
  1. Open iTunes and select the Radio source by clicking it. The Content pane will contain the list of genres available to you. The column headings will be updated to be appropriate to the content. For example, you will see Stream, Bit Rate, and Comment.
  2. Click the expansion triangle for the genre in which you are interested (see Figure). iTunes will connect to the Internet to update the list of channels for the genre you selected, and the genre will expand. You will see the various channels it contains. Look at the stream name, bit rate, and comment for the channels to decide which you want to try. Usually, the comment will provide a description of the kind of music the stream contains.
  3. To play a channel, select it and click Play or double-click the stream you want to hear. The channel will begin to play (this will be instantaneous if you have a fast connection to the Net, or there will be a slight delay if you use a dial-up connection). Just like when you play a song on a CD, the speaker icon will appear next to the channel to which you are listening. Also just like when you listen to a CD, information about the channel will appear in the Information window. This includes the stream name, the song currently playing, and the Web site with which the channel is associated.
You can use the Volume slider to change the volume level and the Stop button to stop playback. The Rewind and Fast Forward buttons work a little differently than you might expect. Rather than moving you in the selected stream, they instead take you to the previous or next stream, which makes sense when you think about each stream as being like a track on a CD.

Monday, March 30, 2009

Listening to Internet Radio


iTunes supports Internet “radio” stations; you can choose one of the available stations and listen to its content similarly to how you listen to a radio station over the air. (The stations are actually Web sites that offer streaming MP3, but they are analogous to radio, so using that as a model is a good way to think about them.) iTunes offers a number of genres from which you can choose, such as Pop, Classic Rock, Jazz, and so on. Listening to one of these stations is much like listening to a CD (or any other source for that matter).

Controlling iTunes from the Mac’s Dock

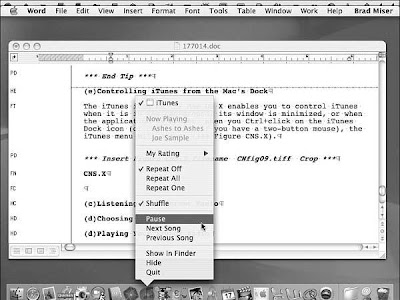
The iTunes icon on the Mac OS X enables you to control iTunes when it is in the background, when its window is minimized, or when the application is hidden. When you Ctrl-click the iTunes Dock icon (or right-click if you have a two-button mouse), the iTunes menu will appear (see Figure). At the top of this menu, you will see information about the song currently playing (the text is grayed out if iTunes is paused). You control iTunes by choosing a command on this menu. For example, you can pause the music by choosing Pause. After you choose a command, the menu will disappear, and you can get back to what you were doing.

Controlling iTunes from the Windows System Tray

When iTunes is running on a Windows machine, an iTunes icon is displayed in the System Tray. Right-click this icon and you will see an iTunes menu (see Figure). At the top of the menu, you will see information about the song that is playing (if iTunes is paused, this text will be grayed out). You can use the commands on this menu just as you can from within iTunes itself. For example, you can skip to the next song by choosing Next Song. After you choose a command, you can move off the menu and it will disappear. This is a handy way to control iTunes without having to make its window active or even show it.
If you don’t want the iTunes icon to appear in the System Tray for some reason, you can remove it. Open the iTunes Preferences dialog box (Ctrl+,), click the Advanced tab, uncheck the Show iTunes Icon in System Tray check box, and click OK. The icon will no longer appear in your System Tray.

Saturday, February 28, 2009

Repeating Tracks


Sometimes, you just can’t get enough. In that case, you can set iTunes to repeat an entire CD once or to repeat only a single song. To repeat your tunes, check out these pointers:
  • To have iTunes repeat an entire CD, choose Controls, Repeat All or click the Repeat button located at the bottom of the window (third one from the left). The Repeat button will become highlighted to show you that it is active, and the CD will repeat when you play it.
  • To repeat only the selected song, choose Controls, Repeat One or click the Repeat button a second time. A “1” will appear on the Repeat button to indicate that only the current song will be repeated.
  • To turn off the repeat function, choose Controls, Repeat Off or click the Repeat button until it is no longer highlighted in blue.

Getting Random


For a little variety, you can have iTunes play songs in a random order. This feature is called Shuffle. To use this feature, click the Shuffle button located at the bottom of the window (second one from the left) or choose Controls, Shuffle. The songs will be reordered in the Content pane and will play in the order in which they are listed (hopefully in a random fashion). The Shuffle button will be highlighted to indicate that it is active.
To return the CD to its natural order, click the Shuffle button again or choose Controls, Shuffle.

Wednesday, January 14, 2009

Choosing the Order in Which Songs Play

iTunes determines the order in which songs play by the order in which they are shown in the Content pane, starting from the top of the pane and moving to the bottom. By default, songs are listed and therefore play in the order they appear on the CD, from track 1 to the last track on the disc. However, you can make songs on a CD play in any order you choose. You have a couple ways to do this. You can change the order in which songs are listed in the Content pane (and thus the order in which they play) by dragging the songs up or down in the pane (see Figure A). When you change the order of the songs in the pane, you change the order in which they will play.
You can also change the order of tracks by sorting the Content pane by the various attributes shown, such as Song Name, Time, Artist, and so on. You can do this by clicking the column heading of the attribute by which you want to sort the list. When you do so, the tracks will be sorted by that column (see Figure B). To change the direction of the sort (from ascending to descending or from descending to ascending), click the Sort Order triangle; the sort direction will be reversed, and the songs will be reordered accordingly. Just like when you manually move songs around, they will play in the order in which they are listed in the pane.

The column by which the pane is sorted is indicated by the column heading being highlighted in blue—this defaults to the first column, which is the track number. (When a CD is the source, the Track Number column is always the first or leftmost column in the Content pane, and it’s unlabeled.) When you select a different column, its heading becomes blue to show that it is the current sort column.
You can also tell which column is the sort column as well as the direction of the sort by the Sort Order triangle. It only appears in the sort column. When the triangle is pointing down, the sort is descending. When the triangle is pointing up, the sort is ascending.

Choosing the Songs You Hear

Let’s face it, you probably don’t like every song on a CD no matter how much you like the CD on the whole. With iTunes, you can choose the songs that play when you play the CD. You can cause a song to be skipped by unchecking the Select check box (see Figure). When the CD plays, it will skip over every song whose check box is unchecked.
To have iTunes include and thus play the song again the next time you play the CD, simply check the Selected check box.

Viewing Information While Listening to Tunes

You can view different information in the Information window, such as the name, artist, and album of the currently playing song. When you first view this window, it contains a timeline bar that represents the total length of the song being played (see Figure). A black diamond indicates the relative position of the music you are hearing at any point in time compared to the total length of the song. At the top of the Information window is a line of text. What appears here changes over time; it automatically rotates between the artist’s name, album name, and name of the song currently playing. You can freeze this display on a specific attribute, such as song name, by clicking the text.

Each time you click, the information will change from album to artist to song name. Whichever one you last clicked on will remain showing in the window. Underneath the album, artist, and song name line is the time information. This can display elapsed time (the amount of time a song has been playing), remaining time (the amount of time a song has left), or total time (the song’s total length). Unlike the name information, this display does not rotate among these values. You can set the value being displayed by clicking the text; each time you click, a different time value will be shown until you have rotated among all three values.
Finally, if you click the Change Display button, the display will become a graphical representation of the volume levels at various frequency groups. You can return to the title information by clicking the button again.

Lots more ways to control the tunes

That’s it. You now know everything you need to listen to an audio CD. However, there are lots more ways to control the tunes, some of which are in the following list:
  • Double-click any song to play it. When you do that, the speaker icon will jump to the song on which you double-clicked and it will play.
  • When a song is playing and you click and hold the Rewind or Fast Forward button down, the song will rewind or fast forward until you release the button.
  • If a song is not playing or a song is playing but you single-click (but don’t hold the button down) the Rewind or Fast Forward button, the previous or next song, respectively, will be selected. You can also choose Controls, Next Song or Controls, Previous Song to move to the next or the previous song. And for yet another method to do the same thing, use the Ctrl+right arrow and Ctrl+left arrow keys on a Windows PC or the „+right arrow and „+left arrow keys on a Mac to move to the next or previous song.
  • You can set a default action for iTunes to perform each time you insert a CD into your computer. You do this with the iTunes Preferences dialog box, which you will be using throughout this part of the book. Choose Edit, Preferences (Windows) or iTunes, Preferences (Mac). The Preferences dialog box will appear. The Preferences dialog box has several panes that you access by clicking the related tab (Windows) or icon (Mac). Click the General tab (Windows) or General icon (Mac). Use the On CD Insert dropdown list to choose the default action iTunes should perform when it recognizes an audio CD. Show Songs just displays the list of tracks on the CD. Begin Playing starts playing the CD as soon as it is mounted on your computer (this does the same thing as clicking the Play button). Import Songs adds the selected songs on the CD to your Library. Import Songs and Eject does the same thing as Import Songs, but it ejects the CD when all its tracks have been added to your Library.
  • To remove a CD from your computer, select it in the Source List and choose Controls, Eject Disc, press Ctrl+E (Windows) or „+E (Macintosh), or click the Eject button located in the lower-right corner of the iTunes window.

Listening to an Audio CD with iTunes

What iTunes has in common with its much less sophisticated cousins the boom box and the standard CD player is the ability to play audio CDs. Although the basic function is the same, iTunes has several tricks in its bag to make listening even better. So, grab a CD and give it a try:
  1. Open iTunes.
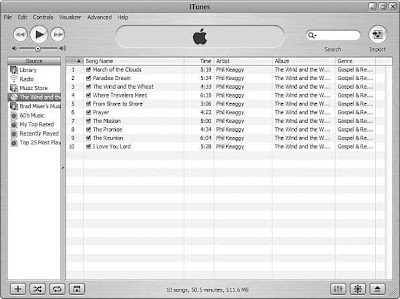
  2. Insert an audio CD into your computer. In a moment, the CD will be mounted on your computer, and it will appear and be selected in the Source List By default, iTunes will automatically connect to the Internet and attempt to identify the CD you have inserted. If it finds it, it will display the CD’s information, including CD name, track names, times, artist, and genre, in the Content pane (in Figure, you can see the CD’s information has been found). This is really cool because iTunes does most of the labeling work for you; this comes in very handy when you want to search or browse for music to create playlists or just to listen to specific tracks. If iTunes finds information for a CD, it remembers that information and displays it each time you insert the CD. At the bottom of the iTunes window is the Source Information display. This will show you the total number of songs on the CD, how long it plays, and the total disc space used. If the CD’s information isn’t located, you can add it yourself
  3. To play the CD, do any of the following: click the Play button in the top-left corner of the window (when a CD is playing, this becomes the Pause button), choose Controls, Play, or press the spacebar. The CD will begin to play. As a song plays, a speaker icon appears next to it in the Content pane to indicate it is the current song, and information about that song appears in the Information window
  4. Control the volume of the sound by dragging the Volume slider to the left to turn it down or to the right to turn it up. You can also control the volume by choosing Controls, Volume Up or Controls, Volume Down. For yet another option, use the Ctrl+up arrow and Ctrl+down arrow keys on Windows PCs or the „+up arrow and „+down arrow keys on Macs to set the volume from the keyboard. To mute the sound, choose Controls, Mute. On Windows PCs you can press Ctrl+Alt+down arrow, whereas on Macs you can press Option+„+down arrow to do the same thing.
  5. To pause a song, click the Pause button, choose Controls, Pause, or press the spacebar.